This post is also available in: Russian
In a previous post we wrote about the options to save video playback breakpoint. To our mind, the most efficient technology is sockets-based. In this article, we’ll show it to you in more detail. You’ll know how to create and run a plug-in for the existing OSMF player in order to send the current position to the server. You can download the plug-in with its source code and examples from our website labs.denivip.ru.
Saving the position using a socket, seems to be most convenient for the following reasons. It does not require installation of Flash Media Server and video download via RTMP. The number of requests to the server is minimized by maintaining a connection throughout the video playback. This minimum data (playback start, pause and rewind) is sufficient to accurately locate a breakpoint, regardless of its reason. For this purpose, for each event you’ll need a timestamp, a related position in a video file, and type of the event. Also, you’ll need the time of disconnection, if any. Below is a simplified code to implement this approach. Although it omits some important aspects of the real application, still it demonstrates feasibility of the chosen approach.
Open Source Media Framework (OSMF) is Adobe’s framework to implement Flash media players in ActionScript. It is designed to empower developers with a unified, easy to use, flexible and modular tool to deliver video content on the Flash platform. A necessity for such a framework is dictated by the abundance of online video, and Flash continues to dominate this area. Although there have been attempts to enhance standard HTML with a similar functionality, such endeavors are yet pretty immature, lacking some features critical for large-scale commercial deployments.
Before starting plug-in development, make sure the following prerequisites are met:
- Download and install Flash Builder IDE. A fully-functional trial version is available for download from Adobe’s website. It runs without activation for 60 days.
- Download Flex SDK libraries version 4.1 or above and add them to Flash Builder (unless they have not been installed with the environment).
- Download and install the Flash Player plug-in version 10.1 or higher. For development purposes, it is preferable to use its special debug version.
- Download the latest version of OSMF library (at the date of publication, version 1.5).
Player
First, let’s create a simple OSMF player and show how the plug-in is connected to it. Its source code only takes a few lines. Create a video sprite and add it to the scene. Now load the plug-in.
1 2 3 4 5 6 7 8 | public function Main() { sprite = new MediaPlayerSprite(); addChild(sprite); factory = new DefaultMediaFactory(); factory.addEventListener(MediaFactoryEvent.PLUGIN_LOAD, onPluginLoad); factory.loadPlugin(new PluginInfoResource(new StatsPluginInfo())); } |
After loading the plug-in, pass its MediaElement to the sprite. Using resource metadata, pass viewer ID to the plug-in.
1 2 3 4 5 6 7 8 | private function onPluginLoad(event:MediaFactoryEvent):void { var resource:URLResource = new URLResource("http://openx.denivip.ru/test-portal/video/omlet.f4v"); resource.addMetadataValue(StatsPluginInfo.METADATA_USER_ID, 777); var media:MediaElement = factory.createMediaElement(resource); sprite.mediaPlayer.media = media; sprite.addEventListener(MouseEvent.CLICK, onMouseClick); } |
Plug-in
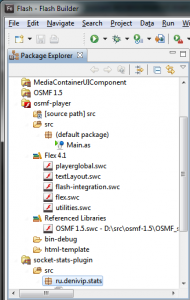
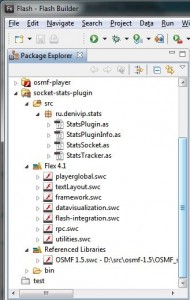
Well, that’s all. Now you should create a plug-in. To do this, create a new Flex Library Project. Its structure is shown in the screenshot:
The initial plug-in files have the following purpose:
- StatsPlugin.as contains the standard code for all OSMF plug-ins.
- StatsPluginInfo.as contains the information necessary for the framework to determine whether this plug-in is compatible with a specific type of resource and also to initialize the plug-in.
- StatsSocket.as contains the code to open a connection to the server where we are going to send the information.
- StatsTracker.as contains the core code which directly monitors the current playback time and sends the data.
For the framework to download the plug-in, you will need to declare the plug-in by extending a standard PluginInfo class. In its constructor, define callbacks to be invoked when the related information is needed:
1 2 3 4 | var items:Vector.<MediaFactoryItem> = new Vector.<MediaFactoryItem>(); var item:MediaFactoryItem = new MediaFactoryItem(NS, canHandleResourceFunction, mediaElementCreationFunction); items.push(item); super(items, creationNotificationFunction); |
The
1 | CanHandleResourceFunction |
method returns
1 | true |
or
1 | false |
depending on whether the plugin is compatible with this type of resource. In our case, it always returns
1 | true |
.
Using the
1 | mediaElementCreationFunction |
method, we can return to the player its own
1 | ProxyElement |
subclass, to override the functionality of standard
1 | MediaElement |
. In our case, it is not needed, so it will always return a
1 | VideoElement |
object.
The
1 | CreationNotificationFunction |
method will be called by the framework when creating a new
1 | MediaElement |
. This is where we initialize the code that will track playback position of the
1 | MediaElement |
passed:
1 2 3 4 5 6 7 8 | private function creationNotificationFunction(media:MediaElement):void { trace('created media element'); var tracker:StatsTracker = new StatsTracker(media); if (media.hasTrait(MediaTraitType.TIME)) { tracker.start(); } } |
Let’s now discuss the code of StatsTracker class. When creating an instance of this class, we create a timer to periodically receive the current position and set the traitAdd and traitRemove event handlers. Now we can start or stop the timer, depending on whether the MediaElement has a TimeTrait with the current position.
1 2 3 4 5 6 7 8 9 10 11 | public function StatsTracker(media:MediaElement) { this.media = media; this.timer = new Timer(500); this.socket = new StatsSocket(); timer.addEventListener(TimerEvent.TIMER, function (event:TimerEvent):void { checkPosition(); }); media.addEventListener(MediaElementEvent.TRAIT_ADD, onTraitAdd); media.addEventListener(MediaElementEvent.TRAIT_REMOVE, onTraitRemove); } |
As soon as a particular Trait has become available, the timer starts and the system connects to the server:
1 2 3 4 5 6 | public function start():void { trace('start tracking'); socket.connect(SERVER_HOST, SERVER_PORT); timer.start(); } |
If the TimeTrait is no longer available, then the socket is closed and the timer is stopped:
1 2 3 4 5 6 | public function stop():void { trace('do not track'); socket.close(); timer.stop(); } |
Twice a second, we send the current position via a constantly open connection:
1 2 3 4 5 6 | private function checkPosition():void { var time:TimeTrait = media.getTrait(MediaTraitType.TIME) as TimeTrait; trace(time.currentTime); socket.writeln(time.currentTime.toString()); } |
The Server Side
The server side is implemented using Node.js. This code simply outputs to the console the beginning and the end of the connection and the data received from the plug-in:
1 2 | var net = require("net"), sys = require('sys'); |
1 2 3 4 5 6 7 8 9 10 11 12 13 | net.createServer(function(socket) { socket.setEncoding("utf8"); socket.on("connect", function() { sys.puts('client connected'); }); socket.on("data", function(data) { sys.puts(sys.inspect(data, false)); }); socket.on("end", function() { sys.puts('client disconnected'); socket.end(); }); }).listen(8125, "0.0.0.0"); |
The server side is designed to provide Flash with a Cross-Domain Policy file needed for working with sockets.
1 2 3 4 5 6 7 8 | net.createServer(function(socket) { socket.write("<?xml version="1.0"?>\n"); socket.write("<!DOCTYPE cross-domain-policy SYSTEM "http://www.macromedia.com/xml/dtds/cross-domain-policy.dtd">\n"); socket.write("<cross-domain-policy>\n"); socket.write("<allow-access-from domain="*" to-ports="*"/>\n"); socket.write("</cross-domain-policy>\n"); socket.end(); }).listen(843); |
Let’s now run the player. As a result, we should see the server console messages like the following:
1 2 3 4 5 6 7 8 9 10 | client connected ... '91.708' '91.708' '91.708' '91.708' '92.292' '92.792' '93.375' client disconnected |
Conclusion
Based on the code discussed, you can easily create a fully functional solution. You just have to support sending of additional viewing details, such as video ID, user ID, and playback related events. Also, your code should be able to save the current video position to the Web site database in case of disconnection.


