In the article we are going to share our experience of finding the optimal way to visualize a waveform in an iOS app, choosing between CAShapeLayer and drawRect(), and certain nuances of using Swift. The publication is targeted at those who create complex custom UI components for sound processing, but also any iOS developers wishing to broaden their horizons.
Problem
We at DENIVIP have created an application to filter noise in audio recordings called Denoise. The use case is as follows: the user selects a video from an album, the application builds a waveform for the audio track, and the user selects on it a noisy segment to be suppressed. The app then does some magic, and the user receives a video with the filtered audio.
We are not going to discuss the denoising algorithm in detail here, but by and large it does not extend beyond the university curriculum in digital signal processing. For a well-organized theoretical material, please visit MITOpenCourseWare. To make it very brief, when the user selects a noisy fragment we use the direct Fourier transform to obtain the frequency spectrum of the "noisy area". After we have saved such frequencies as "bad" and subject to suppression, the algorithm runs through the entire audio track, obtains a frequency spectrum for each chunk and applies the suppression factors to the "bad" frequencies. Then, after an inverse Fourier transform, we obtain a new waveform (i.e., discrete sounds) with the noise substantially suppressed. The challenge is how to properly choose a "noisy" chunk. The longer the video, the more important for the waveform to be interactive, as the user may need to select a few seconds of audio from within a two-hour video.
First of all, we need to visualize an audio track so that it is clear to the user and he can manipulate it (i.e., zoom, navigate or select a fragment). I shall tell at once that if we try to show all the samples in our audio track, we will be out of RAM soon, and our CPU (and GPU as well) would be congested with so many points.
Here is an example. For a 10-minute video, a 16-bit stereo audio track with a sampling rate of 44.1 kHz will have a size of 10 * 60 * 2 * 44100 * 2 ~ 100 MB. This imposes a substantial load on the GPU as well.
An apparent solution would be to split the signal evenly at regular intervals, calculate, say, averages on such intervals and then use the resulting set of averages to display the waveform. In practice, we are going to use the average and maximum values on the intervals, creating for each audio track two waveforms, one on top of the other . Moreover, we may need to add waveforms "on the fly" (to display the filtered signal above the original signal). To further complicate the matter, we also need to zoom the waveform and to navigate over the time axis to select the segment needed.
Note that reading of samples from an audio file and drawing a waveform can take a long time. For instance, on iPhone 5s a waveform for a 10-minute recording is built in about 10 seconds. As you well know, nothing is worse for users than waiting; but it is still worse if they do not know how long to wait. Therefore, we have decided to animate rendering of the waveform loading process to make it intuitive for the user.
Let's sum it up. To solve our problem we need:
-
To be able to read individual samples of an audio track and display the waveform based on their data
-
To be able to render several waveforms (with the capability to add new waveforms when needed).
-
To be able to animate waveform rendering while the samples are read.
-
To add waveform zoom and time-shift functionality.
Existing Solutions
The best of the solutions we have found is EZAudio. All-in-all this is quite an interesting framework, but it doesn't really look like the best fit for our problem. For example, it does not support graph zoom.
For plotting the graph we could have used CorePlot. But we had a general feeling that such a solution is too sophisticated for our problem (also we would have probably needed a separate effort to optimize rendering of a large value set).
Development
Waveform Module Architecture
As our problem states, we should be able to render both the final and progress data. Let's also keep in mind the need to implement zoom and time navigation. Based on this we have decided to implement strong decoupling of the UI layer from the data rendered.
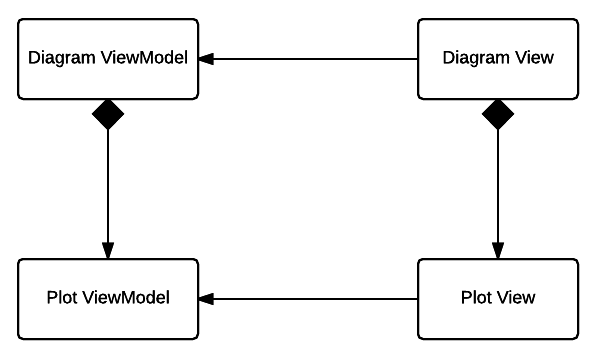
Above is a top-level representation of relationships between classes involved in waveform rendering.
Here:
-
Diagram View is a container of individual waveforms. It also implements synchronization of waveform rendering based on CADisplayLink.
-
Plot View is the class which enables rendering. This class has to be aware only of the data to be displayed at a given time; it would be retrieved from the applicable Plot ViewModel.
-
Diagram ViewModel is a container of view models of individual waveforms.
-
Plot ViewModel is the data source for individual waveforms. This class decides which samples to render (and in which amount).
Here we have omitted the protocols actually linking View to ViewModel. I would only mention that the architecture does not provide reverse links from ViewModel to View.
With this approach we have separately optimized building of a data set for the waveform and rendering of the waveform. Also, this has given us an option to substantially change the data set building process without affecting the View layer. But first things first.
Reading Samples
To build a waveform, we need to obtain uncompressed samples from the audio track. We can do this using the tools provided by the AVFoundation and CoreMedia frameworks.
All the data reading functionality is implemented in the following class:
[gist id=c24531dfb4adb8ef7b60a67f6a1bd2b2 bump=2]
We are not going to dwell much on this code however. I would only say that before reading the samples we can retrieve audio parameters, e.g., sampling rate and channel number (readAudioFormat function) and use them when reading. But you can opt to skip this and use the 44,100 Hz frequency and read from two channels. The encoding depth should be set manually to 16 bit.
Also, I would like to note that sample reading may take a long time. A several-minute video is read in several seconds. This suggests that the algorithm should run in the background.
Processing of Samples
Please keep in mind that generically speaking the sample reading algorithm outputs the blocks of different sizes. In view of this, we need to loop through each new block of samples, calculating the values needed to build the waveforms.
[gist id=fced3ba8b6fa654863bca2a16150b388 bump=2]
Swift vs ObjC What's Better?
Since the app had been originally written in Objective-C, starting to write a new module in Swift seemed counter-intuitive at first. For example, as far as provision of data for graphs is concerned, we had to ensure that Swift would not generate any performance-related issues. We have also tested similar algorithms written in both languages and using similar types of data (for example, while Swift uses the UnsafePointer<Double> type, the Objective-C algorithm uses the double* array).
Here are the test results:
Testing of audio sample reading algorithms and preparing the graph data.
iPhone 5
Swift (Whole-Module-Optimization): 20.1 sec
Objective-C (-Ofast): 41.4 sec
iPhone 6s
Swift (Whole-Module-Optimization): 5.1 sec
Objective-C (-Ofast): 4.1 sec
We have also tested other iPhone models. The results showed significant disparity between 32-bit CPU models and small disparity for 64-bit models. (In further optimization, we mainly used iPhone 5s).
As you can see, there is no big difference. However, some Swift features have been of great help to us. We will say a few words about it later.
Waveform Zoom
To enable zoom, originally we read the samples from an arbitrary audio track segment. See the AVAssetReader object property
[gist id=d88bb2fad2ea196214e27ea7277691b5 bump=2]
Each next zooming initiated another read process.

This is a workable option, but re-calculating of the data for a segment would consume the time comparable with processing of the entire audio file: this takes several seconds or so (see the above data).
Refactoring of sample processing
To implement smooth zoom, we have decided to try another approach. While you are reading the samples, you can build the graph data sets for multiple zoom levels at once. First you would output the data for the original zoom level while keeping the other data sets in a local repository (or in RAM) and output them to the UI as they are needed (as the user zooms, you can replace one data set with another). As we have already mentioned, with our architecture you can do this without the need to change your UI.
We have wrapped all processing of blocks of samples into a separate class where we have implemented a repository for the processed data and flexibility to change the processing logic.
UnsafeMutablePointer<T> was used as an array of processed data. Essentially it is similar to a C array (the documentation is available here: UnsafeMutablePointer Structure Reference, Interacting with C APIs). The implementation example has been taken from here.
[gist id=c0fb3081b149674d659bb7d8eb39628c bump=2]
Note. A very important point is missing here: This class will be used in parallel in different threads (save in the background, read in the foreground). In Swift there are no built-in tool to enable multi-threading, so we have to implement the atomic buffer behavior manually (e.g., like this). In our case, while using Array<T> instead of UnsafeMutablePointer<T> even without synchronization we have occasionally encountered array bounds overflow. With UnsafeMutablePointer<T> this problem has not arisen.
Numeric Types
Now I would like to say a few words about the T associated type in the Channel<T> class.
Let's remember that to implement zoom we have decided to process samples and build data for multiple waveform zoom levels at the same time. Therefore, our focus was not just to achieve high performance, but memory efficiency as well. To save memory in our task it is sufficient to store samples in Int16 while explicitly converting types where needed (seeing as in Swift the standard numeric types are easily converted one to another). However, we have provided a slightly more generic solution to the problem, i.e., with the capability to choose data storage in the numerical data type. For our problem, we have created a protocol for handling numbers of any type (there is no single numeric type in Swift)
[gist id = f7d0a71ff6411e9a446a4b862493df9f bump = 2] Now, in the Channel class code, you can specify the following: [gist id = b32e3a723349be40c0e87f4fa6338523 bump = 2]
Parallel computation for multiple zoom levels
Now you can add sample processing to the Channel class (e.g., to find the maxima).
[gist id = 4a1fe32f34847c3dda309a64c0f73c03 bump = 2] The processing for several channels and at multiple zoom levels would look as follows.
[gist id=64ab536114e0e2fd9c89acfb6bdab5b2 bump=2]
To get the specific data, we request the channel we need. As the user zooms, the reset method is called and the current channel is replaced (at a given zoom level).
The same way you can add the calculation of averages. To make all this work together, we can create one abstract class called Channel and two subclasses, MaxChannel and AvgChannel (for the maximum and average values, respectively).
After the manipulations, zooming looks as follows:

Optimization
Building a data set for the waveform
Generally speaking, the above is sufficient to solve the problem, but we have tried to optimize the algorithm. As far as Swift is concerned, if you need high performance of a particular algorithm, the greatest hindrances would be ARC and dynamic scheduling. By and large, Swift has a number of features which can help the compiler to skip some checks. Here we are going to discuss one of such approaches.
To optimize processing:
-
We created a base class encapsulating the sample processing logic.
-
In the channel class, we created the property of this type.
-
In the logic class, we created a weak link to the class channel.
-
Then we subclassed the specific handlers from this type (for the averages and maxima).
-
Also, we disabled subclassing for the channel class (using the final keyword).
-
And, we enabled Whole-Module-Optimization.
For more detail concerning the 2 last items, visit this page.
The Whole-Module-Optimization mode is enabled in the project settings.

[gist id=8e5220ed977713d51aa4831957bff202 bump=2]
Here are the results of comparing the algorithm speed (clip length is 10 minutes):
In the case of subclassing the channels and the logic of processing within the channels, the time of data set generation is: 27.95 seс
For the variant with the "external" logic it is 6.66 sec
Finally, we also decided to put the buffer inside a separate class to make the Channel class ObjC-friendly (ObjC does not support the Swift generic types).
Graphics
A few words about the graphics.
As our problem states, we have to draw a lot of vertical lines.
Original Version
The original version was based on CAShapeLayer and stroke-based rendering.
[gist id=dd1f08d4869e3b32ae487328b5361664 bump=2]
The time of rendering of 2,000 points per each of the 2 waveforms on iPhone 5s: 18 sec
Although this is a viable solution, for a large number of points (around 1000), we have got delays in frame rendering.
Optimization Option #1 (draw a CGPath without CGPathMoveToPoint)
First of all, we removed the CGPathMoveToPoint function and where needed we started to simply add an extra line instead of moving between the points.
[gist id=193e43e94307ff4295351966c96286e5 bump=2]
Rendering time for the same raw data is: 14.8 seс.
Optimization Option #2 (stroke vs. fill)
Our waveforms are created in quite a simple way: Plot a line from the middle up following the sample level, repeat it symmetrically down, return to the middle, move to the next value. This way we have completely abandoned stroke and can plot lines by filling the desired area (fill). However we still draw a closed shape in this case.
[gist id = 167b715f0ec665fc793f12fc46c598b8 bump = 2] In this case, we get: 12.4 sec.
The gain in speed is small and only visible on a relatively older devices (iPhone 5s or earlier).
Optimization Option #3 (drawRect vs. CAShapeLayer)
Also we have tried, instead of using CAShapeLayer, to draw CGPath in drawRect (CGPath drawing algorithm is the same as in Option #1)
[gist id=8e7a4b4acc44b6bb1725bdb8a027e6b6 bump=2]
Please note that you should properly set the line width based on the screen settings. Otherwise, you'll have no gain in speed and the rendering would be jerky and slow. Let's also note that we have disabled smoothing here.
Here is the test result: 9.46 sec.
By optimizing the CGPath plotting and using drawRect() for rendering, you can speed up the waveform rendering process almost twofold. The result obtained is already sufficient to enable smooth rendering of our waveform.
By Way of Conclusion
- As you can see, Swift is well-suited for the tasks of such level.
- Optimization of algorithms in Swift is a big topic that we will continue covering.
- To achieve the optimal parameters of rendering your graphics, you do not necessarily need to move to OpenGL or Metal.
- An MVVM-like approach to building an architecture with functionality sharing between View and ViewModel is well-suited for implementation of sophisticated interactive interfaces.
You can find our complete project with a demo app here at GitHub.