This post is also available in: Russian
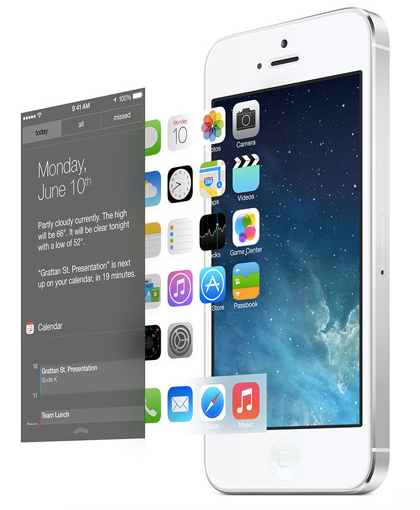
The idea of using the phenomenon of parallax in mobile application design is in no way new. Like many other ideas, parallax was borrowed from the Web design realm, where initially it had been rather popular. Parallax enriches your design with an impressive illusion of depth and space. By now, due to certain encumbrances of Web application development, the fashion for parallax in website design has somewhat subsided. The mobile applications world, however, is quite on the contrary. There the parallax is live and kicking and reluctant to retire. Moreover, it has even become a default home screen in the new iOS 7.
In this post, we are going to tell you of our new DVParallaxView component and show you how to enhance your applications with the parallax effect similar or probably even better than the iOS 7 home screen.
Now, What is Parallax?

Let’s digress for a minute to the physics’ strict domain. This will cater for our better understanding of the mechanism of parallax and help us to consistently reproduce it on the phone.
So, how does the parallax work? It’s all pretty simple. Parallax means change in relative positioning of an object when observed from two different points in space. You can see this effect in the real world any time you need. Use some large background (for instance, a wall in your house) and an object standing closer to you against the background. You may choose a lamppost or a tree as such an object. If you walk along the wall looking at the lamppost, the lamppost will appear moving with respect to the wall. This effect is called parallax, i.e., an apparent shift of the lamppost against the wall when the observation point is moving. And, the closer the lamppost is to you, the higher its apparent speed of relative movement. On the contrary, if you move far from the post and try to walk along the house walls again, the post will stay virtually unmoved. Our eyes can estimate distance in many ways, and one of them is to measure relative shift velocity. If you see a stage with objects moving at different speeds as you move, your eyes immediately tell your brain that such objects are at different distances from you. That’s the root cause of appeal for parallax in design: by imitating it, you can add depth to a plain flat stage.
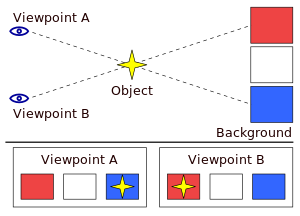
So, in a practical sense parallax means that objects at different distances from you move at different velocities relative to you. Moreover, such velocities are inversely proportionate to your distance to objects. If you’re close to the object, its relative speed is large, if you are far away, on the contrary, the relative speed is low.
Let’s highlight the basic components of this effect. First, to observe strong parallax, we need a background that is unmoving (or moving but slightly compared to other objects). Second, we can observe parallax only if we have objects filling the space between the background and the observation point. Most importantly, the objects should be at a different distance from you. Put in other words, the objects should make up sort of a hierarchy, staying at different distances from the point of observation against the background. And, finally, the parallax can be detected only if objects are moving relative to the observation point at different velocities.
Those three cornerstones, i.e., the background, the objects and their relative motion, are prerequisite to parallax.
Parallax Scrolling
Now we know what the parallax is, we have to decide how exactly we are going to implement it in our code.
The most obvious approach here is to use parallax scrolling. Have you ever played the good old platformer games? If yes, you have probably noticed that while the character was running a level from the left to the right, the background objects shifted in the opposite direction at different speeds depending on their assumed distance from the foreground. Here is a link to Wikipedia for you to remember exactly what was going on.

In games, parallax scrolling was implemented by a stage composed of several layers with objects. Depending on the intended distance of a layer from the screen (e.g., the "forest" layer is closer to you than the "clouds" layer which is, in turn, closer to you than the "sun" layer), the layers are shifted at a relevant speed. This adds certain depth to the flat picture creating sort of a 3D effect. One has to admit that this approach can be well substantiated by what we have learned about parallax so far. Indeed, you can imagine the space between you and the background divided into layers bearing objects.
It is logical to assume that the parallax implementation should be encapsulated in a container component including the other components and having a certain view hierarchy. Shift of a given object will depend on its position in the hierarchy. Let’s now consider: probably, we already have in UIKit a control with a similar feature? Of course, we have! Any UIView contains a hierarchy of other UIViews included into it by addSubview:.
Here we have arrived to the DVParallaxView underlying idea. The idea is to make the component a child of UIView that has the parallax effect encapsulated. The effect will be implemented by assigning a new value to the contentOffset property belonging to the CGPoint type. So in essence, DVParallaxView is similar to UIScrollView. When contentOffset changes, we are going to change position of each view in the DVParallaxView hierarchy. The shift will be inversely proportionate to the element’s distance from the "top" of the hierarchy. Also, as the elements in the subviews array are stored starting from the lowest element in the hierarchy (i.e., the farthest away from the screen), then the shift will be directly proportionate to the index of the processed element at iterating forward through an array. So, we interpret the "distance" between elements similarly to the real world. To control the distance, let’s introduce a factor property to our front-end. It is going to multiply the element’s index in the array. This way you can always adjust your parallax.
Well, the model we have proposed looks viable, as we have tackled all the main points. Now we have got familiar with the parallax concept in DVParallaxView, we can proceed to its practical implementation.
Create DVParallaxView
We are going to devote this chapter and the following one to the creation of a DVParallaxView component.
Before we can proceed directly to implementation, let’s discuss a couple more of DVParallaxView class properties.
First, the parallax looks most impressive against some gorgeous background (remember we have said that the background is an essential parallax component?). Therefore, our class should be able to set a background image. At the root of the type hierarchy we will always have a private member of the UIImageView class called backgroundImageView. This element will serve as a background for DVParallaxView. It will stay at the root of the hierarchy to enable the smallest relative shift peculiar to the background. To render the background image, the component’s public interface will have a special backgroundImage property of the UIImage class.
Second, in iOS 7 the parallax effect is beyond just the background shift. If you take a closer look, you will notice a curious detail: icons are shifted in the direction opposite to the background shift. This is to enhance the effect of parallax shift and the contrast between the background and the application icons which are unmoving at the first sight. As our ambitious goal was to catch up and overtake iOS 7 in parallax, it is absolutely a must for us to add such feature to our component. To do this, let’s create in our public interface the frontView property. To this property, we will pass the view we are going to shift opposite to the parallax.
So, we are through with the arrangements: we are well-versed in theory, and the component structure has also been designed. We can now proceed to creating DVParallaxView. Well, are you ready?
Create a single-view project in XCode, assign to it a name and other mandatory attributes. Within the project, create a DVParallaxView class which is a subclass of UIView. Create a DVParallaxView header file and set its properties as follows.
[gist id=6102728]
We have already discussed above all the outlined class properties, so it is of no surprise to you. Now a couple of properties we have not explicitly discussed yet. These are the two factors, parallaxDistanceFactor and parallaxFrontFactor, used to control the shift of the hierarchy elements and of the front view, respectively.
Create a private interface in the class implementation file. Put the backgroundImageView property into it, as the class has no use to provide public access to it.
[gist id=6102747]
Let the class object be invoked by the initWithFrame: method. The invocation shall include all the initial configuring.
[gist id=6102766]
Here, we have configured the factors based on our personal experience. However, if the parallax seems too strong or too weak for you, please feel free to amend the values. Note that the background is in the view hierarchy right from the beginning, even if its image has not been defined.
If you have been wondering, "How are we going to initiate shifting of views in the component?", you can get the answer from the UIPanGestureRecognizer initializer code. Yes, we remember that in iOS 7 the parallax was invoked by phone tilt. The better day, the better deed.
In UIPanGestureRecognizer, we have passed the panHandler: method selector. Let’s now write code for this method so as not to forget of it later.
[gist id=6102819]
Nothing uncommon here. We read the tap movement and assign the same shift to our DVParallaxView. Here let’s make sure to reset the resulting shift in the end.
Now the fun part. So far, nothing has been occurring on change of contentOffset. Let’s fix this. Create a setContentOffset setter method as shown below.
[gist id=6102866]
Let’s discuss the method in detail. Such variables as backgroundReachedEdgeX and backgroundReachedEdgeY serve to signal that by shifting the background we have reached the image edge. If the background has been set, it is sensible to see whether we have gone beyond the backgroundImage. After all, we do not want users to see a truncated image as it looks unnatural. Therefore, we deemed it necessary to limit the parallax by dimensions of the background image, if available. So, the //1 block contains a check of going beyond the image boundaries.
Block //2 iterates through all the view hierarchy elements to calculate their center shifts depending on their hierarchy level. Also, if we get beyond the image’s X or Y boundary, no shift along such axes will occur.
Now we have created the core logic of the shift. Now all we need is to set the methods of access to the core properties and override the addSubview method.
[gist id=6102923]
Now, first things first. As far as a getter for backgroundImageView is concerned, it’s all clear: that’s a common lazy instantiation, and we create an object only when needed. At setting of ParallaxDistanceFactor ParallaxFrontFactor, automatic negative validation is performed. The backgroundImage setter sets a background image in backgroundImageView and, at the same time, aligns its position on the screen. The frontView setter also adds frontView to the subview hierarchy. So, it makes no sense to add it manually. Finally, the overriden addSubview: method is running normally, if frontView has not been defined in DVParallaxView, but if it has been defined, any view will be a level below it in the hierarchy. After all, it goes without saying that frontView is always in front.
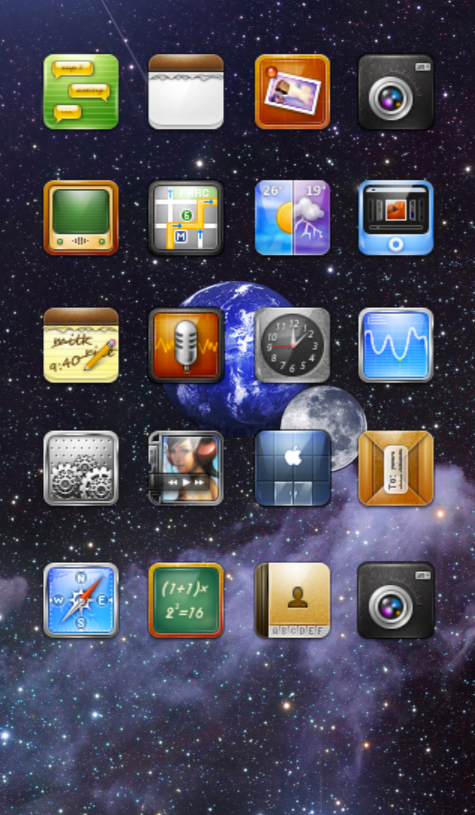
Enough with this; let’s now focus on the main viewController of our test project. It is now high time to add our new component and check it in action. Since we want to resemble the new home screen in iOS 7, we are going to recreate it in our test project. For this purpose, we need a background image (preferably, with the cosmic space) and the application icons. Moreover, since our component can support other objects between the background and the foreground, we can add them too. Once we have space as the background, we can now leverage on this topic and revitalize the cosmic space with our planet Earth and its satellite, the Moon. You can find all the images on the Internet or get them from our test project on github.
In iOS 7, the application icons are in the foreground, so in DVParallaxView we have to put them in frontView. To do this, we are going to create a UIView to put all the icons there. To avoid manual creation and placement of all the components, let’s create a container and icons in the Storyboard, and then add them to the controller.
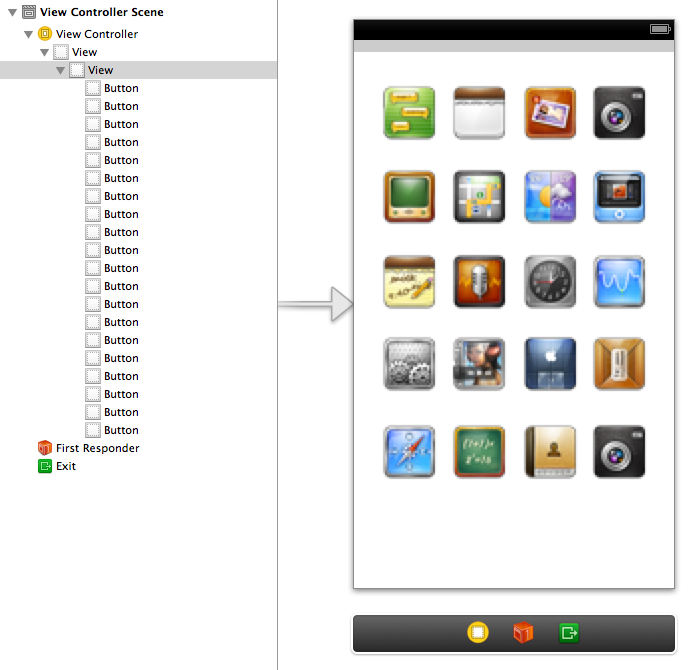
Here is how our application’s front view looks like. Bind the UIView container as an IBOutlet to the controller and name it frontView. Let’s now create an instance of DVParallaxView.
In the private interface of your controller, create a parallaxView property. Create a getter for such a property.
[gist id=6103396]
As you can see from the code, after an instance of the DVParallaxView class is created, a "galaxy2" background is added to it, and then the images of the Earth and the Moon are added to the view hierarchy. Then, we set the frontView property as a foreground. Now all we have to do is to add our component to the hierarchy of controller view hierarchy. Add this line to the viewDidLoad: method
[Self.view addSubview: self.parallaxView];
The parallax is ready and we can run the project now. As you can see the component we have created at this stage gives quite a significant effect of parallax.
There is but one more item to be discussed. So far, the elements were shifted by tapping. It’s now time to fix that. Let’s attach a gyroscope to DVParallaxView.
Add Core Motion
If you have read our post titled Mastering Core Motion in iOS, you already have all the skills needed to use the gyroscope in this project. For this purpose, as you know, you have to add the Core Motion framework to the project. But how exactly are we going to use the data from the sensor? In our project, we have chosen rotationRate to reflect the phone’s tilt. That is, contentOffset will change at a non-zero angular velocity.
Add the framework to the DVParallaxView class implementation file.
# Import <CoreMotion/CoreMotion.h>
Then, create the motionManager and displayLink properties in the private interface of the class.
@property (nonatomic, strong) CMMotionManager *motionManager;
@property (nonatomic, strong) CADisplayLink *displayLink;
CMMotionManager is the main CoreMotion class used to access the sensor readings. CADisplayLink is a timer run at the screen refresh rate to invoke the gyroscope’s data refresh method.
Now let’s add the methods used to access the new properties.
[gist id=6103812]
Evidently, the developers using the DVParallaxView component do not necessarily need to use a gyroscope. Perhaps there would also be other conditions and actions to change contentOffset. Therefore, parallax control by the gyroscope should be a configurable component’s option. For this purpose, let’s open the gyroscopeControl property (BOOL), in our public interface. If set to YES, the component starts reading the data from the gyroscope and shift hierarchy members at device tilt. If set to NO, the component ceases to respond to changes in the device’s angular velocity. The motionManager and displayLink properties should be disabled so as not to waste CPU resources.
As we have mentioned above, create a gyroscopeControl property in the public interface.
@property (nonatomic, strong) BOOL gyroscopeControl;
Then, create a setter for it.
[gist id=6103865]
Note that, if the property is set to YES, the motionManager starts to receive readings from deviceMotion rather than the gyroscope. The reasons behind this have been described in detail in our post, Mastering Core Motion in iOS. If set to NO, getting of the data stops, displayLink is removed from all streams by calling the invalidate method, and the motionManager is set to nil.
Now, we just have to write a method to convert the gyroscope readings to the contentOffset data and implement the displayLinkHandler method called from the displayLink timer.
[gist id=6103881]
Please make sure to define two constants in the beginning of your implementation file. We have used them in the conversion method.
#define DV_ROTATION_THRESHOLD 0.1f
#define DV_ROTATION_MULTIPLIER 2.5f
When creating a DVParallaxView object, set its gyroscopeControl property in the controller class to YES.
Finally, the gyroscope has been added and its readings are correctly converted to the value of shift. Now you can build your own project and run it on your device. Looks great, yeah? Note that the gyroscope can run on a real device only.
Conclusion
If you are reading this paragraph, it means you’ve just created an individual component supporting the parallax effect, just as in iOS 7. And even more, the effect in the DVParallaxView component was more pronounced, as it has not just shifted the background and the foreground, but also the entire hierarchy of elements between them. As you can see now, our parallax component has quite an intuitive design.
You can use our DVParallaxView component absolutely for free. It is downloadable from our repository. Please feel free to use the component and enhance it: we welcome any of your suggestions!