This post is also available in: Russian

For any iOS application, interface appearance is a key driver to success. Sleek and elaborate design combined with impressive look and feel of your app, can enhance user experience and add points in favor of your application in the App Store.
How can you best impress the user? Nice appearance can be achieved in many ways, one of them is to apply effects on different parts of the interface and the image as a whole. Among all these, perhaps the most commonly used effect is Blur, and we are going to discuss it in this post. We will tell you how to apply Blur using different frameworks, and also we will experiment a little to benchmark performance of different methods.
So, what is Blur?

If you are well-familiar with Blur and have been possibly using it for quite a long time in your applications, you can safely proceed to the next section, as you’ll probably learn nothing new from this brief intro.
In real life, you have, most probably, seen the Blur effect quite often. If objects move relative to the camera or if they are out of focus, their image appears blurred. In movies and games this effect is often used to emphasize the dynamics of the scene shot or to highlight important frame details by blurring the rest of the frame. Blur can add a realistic flavor to your interface by slightly smearing the images of moving elements relative to the still ones.
To apply Blur to your images in computer applications, a so called convolution operation is used. Convolution means producing a new image by applying to each pixel of the original image a weighted mask that depends on the brightness of adjacent pixels. As far as Blur in iOS applications is concerned, it is often no need for us to know the convolution mechanism in detail. In most cases, you just have to apply a ready filter object to your image. However, some low-level frameworks like vImage do not have such high-level capabilities as they run close to the hardware and are manipulating with such concepts as kernel (weighted mask) and convolution. In this context, it would be nice to learn at least the basics of image blurring.
Blur in Core Image
So, which tools do we have in iOS to process images? Of course, the Core Image comes first to our mind when we feel like manipulating images.
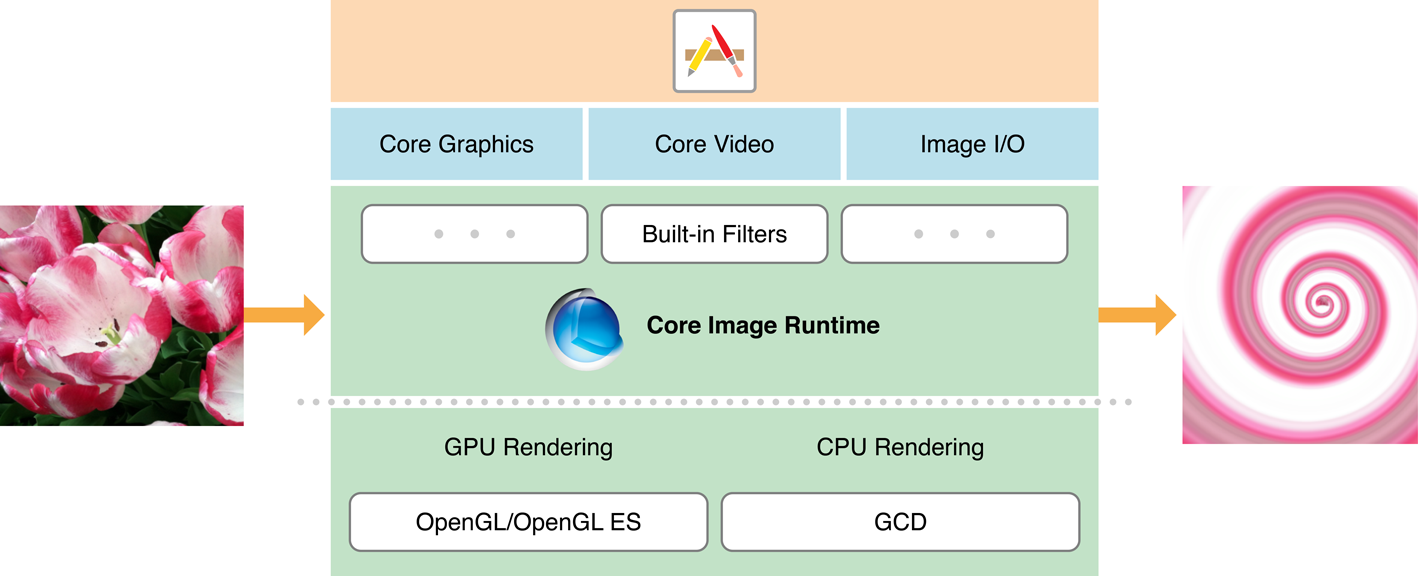
Core Image is the framework that has been designed specifically for processing and analysing static images and videos. Core Image has become available to developers since iOS 5. It can leverage both CPU and GPU resources. Core Image modifies images by using filters. A filter is a class that abstracts a certain visual effect. To add an effect to your image, you need to pass it through a filter. You send an image to the filter input and obtain a resulting image from the filter output. So, what are the practical aspects of adding visual effects to images? Well, everything is easy and simple and fits in four easy steps.
- First, we create an image object, CIImage, and the context object, CIContext.
- Then we fetch the filter we need from the list of filters existing in Core Image for this system.
- Then we bind the filter to the image.
- And, finally, we obtain a new image from the filter output.
Well, that’s all. You can use multiple filters; in this case, you have to concatenate them by connecting their outputs and inputs in a proper sequence. Please note that, the image is rendered neither at the time of applying the filter nor at the time of binding the image to the filter. To ensure the best efficiency, the framework uses deferred processing: the image with effects is rendered immediately after it has been requested from the context.
Generally speaking, this is all you need to apply blur to an image using Core Image. Just find the Blur filter you need and apply it to the image. Please note that, not all filters listed in the documentation are available in the iOS. However, all filters are available in MacOS by default. Additionally, in the description of each filter it is specified whether it is possible to use it in the iOS, or not. The framework is constantly enhanced with new filters, so please take heed of the iOS version supported, as some of the filters were added only starting from iOS 6.
Here probably your might have relaxed, feeling that the job is now complete? Well, you should not. If, by any chance, you need to use several filters or even more so, have to apply filters to video images on the fly, then you’d probably be surprised to find out that the application has noticeably slowed down. So, what can be done to optimize superposition of effects? An entire section in the official documentation is dedicated to this, so here we would like to give you just a couple of easy tips.
Tip 1. If your application requires frequent superposition of filters, avoid creating of a new CIContext context each time you invoke the image transformation method. This is equivalent to creating an OpenGL context for each new image frame. Create the context once during initialization of an object and use it afterwards. Research has shown that re-creating the context is a highly resource intensive task. So, it is no need to overload the processor.
Tip 2. Make a reasonable choice of a processor used to handle the image: CPU or GPU. GPU is preferable only if you need to process live camera videos. In almost all the other cases, GPU fails to provide the desired benefits and has its downsides. If you exit the application while processing an image on GPU, all the image data that has been stored in the GPU memory, will be lost. Processing on the CPU, on the contrary, allows you to process the data in the background. The size of images processed on the GPU is limited by 4kx4k pixels on iPad 2 and 2kx2k on older models, while the CPU supports 8kx8k pixels. Also, please keep in mind that if you are using both Core Animation and Core Graphics, they might compete for GPU resources, again slowing down the application.
To explicitly instruct the Core Image framework to use GPU, you need to create a CIContext object using the contextWithEAGLContext static method.
The sample code of obtaining an image with Gaussian Blur is shown below.
[gist id = 4493284 bump = 1]
In the sample, we assume that CIContext has been created as a property within an object.
On raywenderlich.com, there is a nice intro on the basics of Core Image. Also, as an example, you can use the LBBlurredImage application based on the framework.
Blur in vImage
Starting with OS X v10.3, when Apple began supporting Intel processors, the system API has been expanded with the Accelerate framework, later updated to the current version available in OS X v10.4. It is designed to run various mathematical operations with data vectors using a vector co-processor. The framework is mostly praised for its versatility: it has no dependence on any particular type of CPU, it is able to independently detect the presence of a vector operations co-processor, and if it is available, use it for mathematical computations. The framework has been designed and created in such a way that the developers do not have to concern themselves with multi-threading. As it has been described in the Apple help on Accelerate, the framework will, if possible, itself distribute tasks among threads and will choose the optimum way to run them using a vector co-processor, if any. For a more detailed description of Accelerate, please refer to Apple’s official developer website and MacResearch.
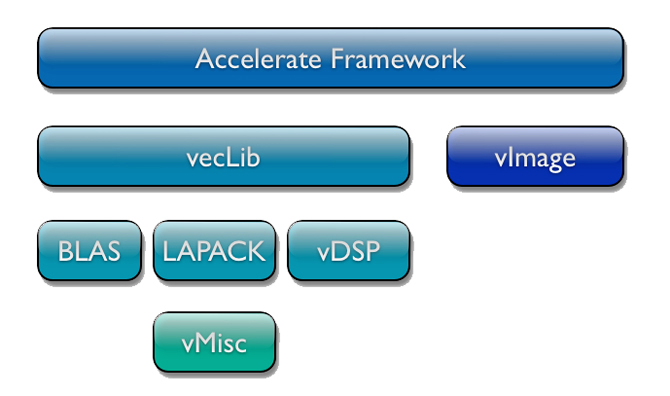
Accelerate consists of two frameworks: vImage is used for image processing and vecLib is used to run various mathematical operations used in digital signal processing. Obviously, in this post we are interested in vImage. Comparing vImage with Core Image, first we should say that their functionality overlaps. So, if all you need is to process static images of medium resolution, it is quite OK to use Core Image. However, if the effects you need are missing from Core Image or you would like to modify them somehow, vImage might be preferable, as it can more flexibly control the pixel matrix conversion process. Also, in the case you have to quickly process high resolution images, vImage can be more handy. Another advantage over Core Image is that vImage is supported in all systems, starting from OS X 10.4.
The vImage API is written in C and consists of a set of functions and data types. It has no objects, classes or methods. You have to use malloc to allocate memory and operate only with a set of pointers and addresses. Many proponents of the object-oriented paradigm might probably feel unhappy, but such a low-level approach is a worth sacrifice to ensure performance.
So, how can we leverage vImage to apply Blur? This framework gives you an ultimate freedom to configure the mask and apply convolution or other operations to the image pixel matrix.
To perform a convolution with an arbitrary mask, call one of the functions from family
vImage_Error vImageConvolve_ * (…),where * should be replaced with an applicable image data format. The vImage framework can use one of several formats for image data. More details can be found in the official documentation. The function accepts the addresses of buffers for input and output data, the mask and other parameters. Should anything go wrong, the function call will return an error number, and nothing will be written to the output buffer. It should be specifically emphasized that, the mask is a two-dimensional matrix, and the number of elements along its dimensions should be odd, according to the documentation.
In addition to the standard common-purpose convolution functions, where the mask is passed, vImage provides special overlay effects based on preset masks. Such functions are available for the blur effect also:
vImage_Error vImageBoxConvolve_* (…); vImage_Error vImageTentConvolve_* (…);They do not require developers to pass the address mask, as they use their own standard blur mask. At the same time, performance of such functions can be by orders of magnitude higher than for the common convolution function described above. For more details on the features, please refer to the official guide.
However, applying of convolution is not everything you need to do (we have admonished you that this framework is not so simple)! Now you have done the convolution and got a blurred image, you may get surprised to find that it has changed colors. So what has happened? The issue behind this is image optimization in Apple iOS. Details can be found here; in this post we are going to touch upon this nuisance just in brief. For the purpose of image optimization, red and blue channels are swapped. It means that, the image is transferred from the RGBA format to BGRA. But still we are lucky, as vImage offers a solution to this issue also: the vImagePermuteChannels_ARGB8888 function. With it, you can set a mask representing a 4-digit combination of 0, 1, 2, and 3 relating to channels R, G, B and A, respectively. Position of digits in the mask indicates the sequence of channels. So, to revert to the standard color format, we should invoke this function using mask 2103.
But enough story-telling! Let’s look at the framework in action. Use the following method to obtain blurred images.
[gist id = 4396237 bump = 1]
As you can see from the vImage code, first you get "raw" image data, perform convolution, and then collect the data back into UIImage. IndieAmbitions.com has published an excellent guide to creating a blurred image with vImage. Also, as an example you can use application RNBlurModalView that uses the Accelerate framework to blur the interface on UIAlertView.
Blur in GPUImage
GPUImage, a pretty well-known framework for image and video processing, also provides tools for image blurring. This framework is likely to set a record of the ease of blurring. Similarly to Core Graphics, it applies filters to images. GPUImage leverages OpenGLES to handle images, which means all the processing is done at the GPU level.
The process of applying the filter is even easier than in Core Image! You only need to create a filter and send an image to its input. No need to worry about the context or a device to do the processing on. This piece of code is encapsulated in the framework code.
In the context of applying blur to the interface components, this framework is known by the fact that, using the GPUImageUIElement class you can send to the filter input the element itself rather than its image, while the processing result can be sent to a special GPUImageView object, also without any extra assignments, just by specifying it as a filter output. Of course, there’s no magic here: implementation of GPUImageUIElement is based on getting an element layer image by calling a standard renderInContext: method; still, it is done to ensure the utmost efficiency, so it has almost no impact on performance (see the final test results).
This framework includes several Blur filters. Strictly speaking, Core Image has even more of them (as much as 7). However, of all this variety only GaussianBlur is available to iOS at the moment. From GPUImage you can use: FastBlur, GaussianBlur, GaussianSelectiveBlur and BoxBlur.
The sample code for applying Blur using this framework is as brief and simple as possible.
[gist id = 4493268 bump = 1]
As an example of applying Blur with GPUImage, you can use the DLCImagePickerController component.
Rasterize in CALayer
To conclude this overview, let’s consider a not quite usual way to blur an image. Strictly speaking, the proposed method is not actually Blur, but the result is somewhat similar visually.
The objects of the CALayer class and their child objects have a boolean property called shouldRasterize. If it is set to YES, the bitmap image of the CALayer object is saved to the cache and is then used instead of the object itself. This method can help you reduce the cost of the CPU to redraw the layer in each animation frame, while allocating more RAM to the cache. There are still other nuances, like pixelation of the layer image in this case. For more details on this property, view WWDC2010 Session 425 video titled "Core Animation in Practice, Part 2" or read the official documentation.
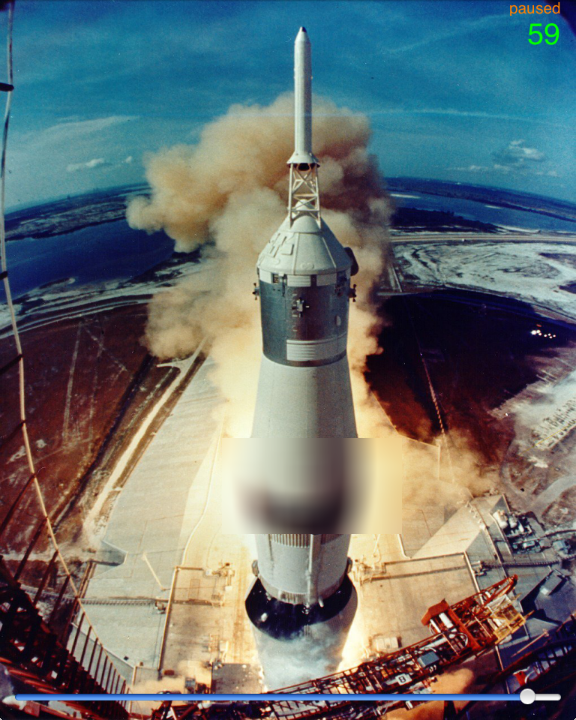
There is also another property associated with rasterization of the layer image. It is called rasterizationScale and, as it is obvious from its name, it is responsible for image scaling during rasterization. By playing with assigning different values to it, you can see the picture blurred. However, this is not like a normal Blur effect. The blurring effect that we expect and discuss in this post, assumes that all the image elements not moved, but just look blurred. However, with the said method the image changes, first becoming more pixelated, and then even moving part of the image outside of the rendered area. The resulting effect is shown in the images below.

No doubt that this is not Blur, but still we recommend you to look at the resulting effect closer: perhaps you will find it of use to your application.
Frameworks compared
Finally, we would like to benchmark performance of these three frameworks in the context of applying blur to an animated interface element.
The purpose of our experiment was to make it clear, what performance would be shown by the above frameworks used to blur elements with static or animated content. In essence, the frameworks obtain an image from the element, apply Blur to it, and then show it on top of the original element. The difference between tests is, that in case of static content you have to obtain the element image just once, but in case of an animated element you have to do it at a screen refresh rate to make the animation smooth. The test project has been published at GitHub.
The purpose of the test has been to determine FPS after appying Blur with the above frameworks at a given screen refresh rate.
Test with Animation

While testing an animated element, we used frameworks to blur UIView containing a moving and zooming image and a moving-only color box. The animation has been done manually using the CADisplayLink object that calls a redraw function at the screen refresh rate, rather than by using standard Core Animation tools. The results obtained with animated content on different test devices, are given in the table below.
| Device\Framework | Core Image | vImage | GPUImage |
| iPad 2 | 8-12 | 11-15 | 10-12 |
| iPad New | 2-4 | 3-4 | 15-22 |
| iPad 4 | 4-7 | 5-8 | 17-22 |
| iPad mini | 8-13 | 10-15 | 10-12 |
First of all, we should note that the results demonstrated by all frameworks are quite low. For smooth animation you need no less than 60 FPS, and as you can see from the table, no framework has attained to such performance. This does not mean that the frameworks themselves fail to address the issue: we ran a profiler and found that almost half of the time the application spends to get the UIView element image at the screen refresh rate. This means that, if you optimize the process of getting images to be blurred, you can achieve much better results. Also from the table you can see that, the highest efficiency is shown by the GPUImage framework. So why does it have such a higher performance compared to the others? The fact is, that as it has been said above, this framework does not explicitly need to receive an element image. Of course, actually its implementation is also based on renderInContext:, but its use is well-optimized by using the GPU. The framework is a good demonstration of what improvements can be achieved by optimising the process of getting the images.
However, it also has its downsides. For a high quality blurring using GPUImage, you have to increase the number of filter passes over the image. This leads to reduced performance, however slight it is.
The vImage framework, although it has not shown itself the best way, yet remains the only framework capable of creating motion blur: in GPUImage no such filter exists by default yet (I hope that this is just "yet"). Still, you can try making your own filter. By default, vImage allows you to specify an offset for the mask, resulting in a high-quality motion blur.
Test with Blur Area
The second test was to apply the blur effect to a small moving area on a static image. This test is much easier from the load viewpoint, as it requires just a single call of the renderInContext: method. It represents a clear demonstration of the extent how the calls of this method might affect performance of this task. The results of the second test are shown in the table below.
| Device\Framework | Core Image | vImage | GPUImage |
| iPad 2 | 48-60 | 60 | 60 |
| iPad New | 48-60 | 60 | 60 |
| iPad 4 | 60 | 60 | 60 |
| iPad mini | 48-60 | 60 | 60 |
| iPhone 5 | 60 | 60 | 60 |
The conclusions are quite clear: all frameworks have been successful, with a minor performance degradation observed only in case of Core Image in case of intensified blur.
Well, it’s all for this research. We hope that you have enjoyed this topic just as we had, and that you have learned lots of helpful tips. Enjoy your development process!