This post is also available in: Russian

In the latest iOS based devices, camera is a major driver of popularity of these devices. The capability to capture video and encode it to H.264 High Definition on the hardware level that emerged in iPhone 4, has been accepted enthusiastically by both users and developers of new applications. Continuing our series dedicated to AV Foundation and the related frameworks, in this post we will discuss how to capture a stream from the camera and how to process, save and distribute it.
Starting with iPhone 3GS, it became possible to record 480p video from the rear camera. In iPhone 4 and iPad 2, the front camera has emerged having a conventional resolution, while the rear camera has been enhanced to 720p commonly referred to High Definition. In iPhone 4S and the new iPad, the camera captures 1080p video, which is an ideal resolution for most of modern TVs.
Photo Capturing in UIKit
Most of the camera related features are part of the AV Foundation Framework. Still, as with Media Player Framework, Apple has provided developers with
1 | UIImagePickerController |
, an easy to use and convenient class to capture photos and videos. It offers a ready-made user interface and supports a full set of features: flash control, switching between cameras, zoom, focus point selection , choice from the library, photo editing. To use it, the application has to perform the following steps:
- After the user selects a source: photo library, camera or album of saved photos, use the isSourceTypeAvailable: method to check whether the device you use has access to the selected source.
- Use availableMediaTypesForSourceType: to check, which types of content are available from the selected source: photos, videos or both.
- Configure the controller by assigning to the mediaType property the list of content expected by the application.
- Display the controller. After the user selects the content or taps "Cancel", hide the controller from the screen.
2
3
4
5
6
7
8
9
10
11
12
13
14
15
16
17
18
19
20
21
22
23
24
25
26
27
28
29
30
(UIViewController*) controller
usingDelegate: (id <UIImagePickerControllerDelegate,
UINavigationControllerDelegate>) delegate {
if (([UIImagePickerController isSourceTypeAvailable:
UIImagePickerControllerSourceTypeCamera] == NO)
|| (delegate == nil)
|| (controller == nil))
return NO;
UIImagePickerController *cameraUI = [[UIImagePickerController alloc] init];
cameraUI.sourceType = UIImagePickerControllerSourceTypeCamera;
// Displays a control that allows the user to choose picture or
// movie capture, if both are available:
cameraUI.mediaTypes =
[UIImagePickerController availableMediaTypesForSourceType:
UIImagePickerControllerSourceTypeCamera];
// Hides the controls for moving & scaling pictures, or for
// trimming movies. To instead show the controls, use YES.
cameraUI.allowsEditing = NO;
cameraUI.delegate = delegate;
[controller presentModalViewController: cameraUI animated: YES];
return YES;
}
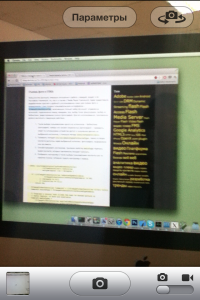
1 | UIImagePickerController |
supports limited GUI customization using the
1 | cameraOverlayView |
property to define a view shown on top of the standard interface.
To engage the capturing functionality to the fullest or implement some custom feature, you have to use the AV Foundation Framework.
AV Foundation Framework
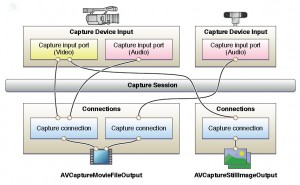
To get the data from the camera and microphone, you have to start a capture session. The session coordinates the data streams running from inputs to outputs. As an output, a video file can be used, for example. Moreover, to the session you can bind a preview layer showing the camera picture. The session is a graph where vertices are input objects
1 | AVCaptureInput |
and output objects
1 | AVCaptureOutput |
, and edges are the
1 | AVCaptureConnection |
objects. Input devices that are sources of data for input objects are described by the
1 | AVCaptureDevice |
class.
To initialize a session, add the necessary inputs and outputs, then the connections will be created automatically, following the principle "connect all inputs with all outputs". After that, set one of the predefined attributes for a session: high, medium, low, etc. On initialization, you can start a new session using the
1 | startRunning |
method and stop it by the
1 | stopRunning |
method.
On various models of devices you can have access to multiple cameras with a variety of characteristics. Some devices may not be available as they are used by other applications. Therefore, to seek and select an appropriate device, the
1 | AVCaptureDevice |
class provides a variety of methods:
1 | hasMediaType: |
to select content type (audio/video),
1 | supportsAVCaptureSessionPreset: |
to check the bitrates supported,
1 | isFocusModeSupported: |
to detect the supported auto focus modes, etc. If the device supports auto focus and auto white balance, all such features can be enabled or disabled.
Within a session, you can switch from one device to another, for instance, from the front camera to the rear camera, without any session interruption. To do this and change other settings, you have to enter appropriate code in such calls as
1 | beginConfiguration |
,
1 | commitConfiguration |
, to minimize the use of new settings.
2
3
4
[session removeInput:frontFacingCameraDeviceInput];
[session addInput:backFacingCameraDeviceInput];
[session commitConfiguration];
Within the capture session, the following classes can be used as outputs:
- AVCaptureMovieFileOutput to store session data to a video file.
- AVCaptureVideoDataOutput to get individual video samples shot by the camera.
- AVCaptureAudioDataOutput to get individual audio samples captured by the microphone.
- AVCaptureStillImageOutput to save a still picture from a camera along with associated metadata.
Saving to File
1
AVCaptureMovieFileOutput
1 | AVCaptureMovieFileOutput |
allows you to specify the following basic recording parameters: the maximum duration of the recorded file, after which the recording will stop automatically, or free disk space allocated for the record. The quality parameters of the output video file depend on the session parameters and recording modes supported by your phone model.
1 | startRecordingToOutputFileURL method: recordingDelegate: |
begins writing to a file, and upon completion, calls a delegate method
1 | captureOutput |
:
1 | didFinishRecordingToOutputFileAtURL: fromConnections: error: |
. In this method, it is important to check the cause of recording interruption, as this may occur by completely different causes, some of which might be independent of the application: disk full, microphone disconnected, incoming call, etc.
To add geo-location data to the recorded video file or picture, the
1 | metadata |
property containing an array of
1 | AVMutableMetadataItem |
objects. In addition to geolocation, the following metadata is also supported: date of recording, language, title, extended description, and more.
Per Frame Processing
After the session launch, such outputs as
1 | AVCaptureVideoDataOutput |
and
1 | AVCaptureAudioDataOutput |
start to pass data to the delegate method
1 | captureOutput: didOutputSampleBuffer: fromConnection: |
individual uncompressed samples taken from a camera or a microphone. The delegate method is called from a background sequential queue, which guarantees that the frames are processed in the specified order, without blocking the main queue. When handling the frames, please ensure that your application can process them at the same rate at which they arrive at the input. In this context, hardware acceleration offered by OpenGL ES and Accelerate Framework could be helpful.
As a container of the sample data, a
1 | CMSampleBuffer |
structure is used. The Core Media Library allows you to convert the structure into a byte array containing the sample media data and vice versa, or to the UIImage object for video frames, and get the sample related information: description of data format, number of audio channels, sampling frequency, timestamp, duration, etc. The programmer can specify the most easily handled format of samples before the recording starts. For example, a frame with pixels encoded in BGRA would be a better fit for Core Graphics or OpenGL.
Preview
To preview images from the camera, the
1 | AVCaptureVideoPreviewLayer |
layer is initialized from the capture session:
2
3
4
5
6
7
CALayer *viewLayer = <#Get a layer from the view in which
you want to present the preview#>;
AVCaptureVideoPreviewLayer *captureVideoPreviewLayer =
[[AVCaptureVideoPreviewLayer alloc]
initWithSession:captureSession];
[viewLayer addSublayer:captureVideoPreviewLayer];
Similarly to
1 | AVPlayerLayer |
, the preview layer supports several scaling modes: Fit to screen, keeping the aspect ratio and trimming edges.
The
1 | AVCaptureAudioChannel |
class allows you to obtain the current maximum and average sound level to be displayed in the application interface.
For a sample involving the above AV Foundation framework properties, please read the following guide section: Putting IT all Together: Capturing Video Frames as UIImage Objects.
Per Frame Video Recording
The
1 | AVAssetWriter |
class allows you to make per-frame video recording. You can get sound samples and video frames from the capture session or create your own samples and frames within the application. For this purpose, you can use ready-made images, screen shots, pictures made in Core Graphics, or OpenGL 3D scenes. The tracks of the resulting video is encoded by one of the codecs supported by the device, for instance, by H.264 and AAC. So, whenever there is such a possibility, the coding is made on the hardware level, without loading the CPU.
At initialization of
1 | AVAssetWriter |
, one or more
1 | AVAssetWriterInput |
inputs are created, corresponding to the specific audio and video tracks of the output file. For them, we define the output stream parameters, such as the bitrate, sampling rate, and video resolution. After this, the
1 | startWriting |
method is called to start video recording, and the
1 | startSessionAtSourceTime: |
and
1 | endSessionAtSourceTime: |
methods at the beginning and end of recording of individual video segments, respectively. During the recording session, the frames are added by the
1 | [AVAssetWriterInput appendSampleBuffer:] |
method.
Assets Library Framework
Another small framework is Assets Library that provides an application with read and write access to the device library of photos and videos managed by the default Photo application. Most of the methods of this framework are asynchronous, partly because while performing various actions, the operating system may prompt for user’s permission to access the library. To find the necessary photos, the framework provides a software interface that is very similar to that of the common Photo app, i.e., choosing from a variety of collections, filtering by various criteria.
Core Image
The Core Image framework is designed to handle static images such as photographs. In iOS 5, this has been enhanced by several new fascinating features applicable to video capturing as well.
- It includes detection of various features on a photo.
- New filters for photo processing: red-eye removal and automatic enhancement of photos.

Currently, the only object that can be detected on a photo is the human face. Using the
1 | CIFaceDetector |
class, you can find an image area supposedly containing a face. The object of the found
1 | CIFaceFeature |
characteristics contains the following information: face boundaries, position of the right eye, left eye and mouth. It should be noted that this function cannot recognize individuals in the true sense, i.e. it can not distinguish one person from another or identify a face with a particular person.
To use the Core Image features in video capturing, you should specify the BGRA output format and convert the recorded frames into the
1 | CIImage |
objects using a class initialization method.
Live Video Streaming to the Network
However, iOS SDK does not provide built-in support of streaming of compressed video captured by a camera in real time, even though the hardware of Apple mobile devices supports that, as evidenced by relevant applications like Facetime, Skype and Ustream. The current SDK version lacks support of two critical live streaming features:
- in-memory generation of compressed video buffers that can be sent over the network.
- Support for the existing live streaming network protocols ensuring minimal delay, such as MMS, RTSP or RTMP.
Fortunately, the iOS platform is not limited to the built-in SDK. In our application, we can use any library written in C, C++, Objective-C or other languages buildable as a link library, provided that the code is well portable between UNIX-like operating systems and is normally compiled for the armv7 target platform. Most of the open source libraries meet these requirements.
Another limitation which the developer may encounter when using certain open libraries, is that the terms of the popular General Public License (GPL) are incompatible with the App Store’s Terms of Service. One example of such a library is libx264 used to encode video with an H.264 codec. Probably, at the Apple review phase, this would not affect a decision regarding your application, however afterwards any of the library’s developers may easily remove your application from the App Store by filing a complaint to Apple. In addition to GPL, there are other libraries that are better compatible with proprietary development, such as LGPL, MIT, BSD, so most of the open source libraries use them. For example, the ffmpeg code is partially, and libfaac and librtmp are fully licensed under LGPL.
However, using of third-party libraries does not completely solve the issue of live streaming. The fact is that, none of the current open source libraries can fully harness the power of hardware video encoding on Apple devices. CPU-based encoding is not fast enough, as it takes a huge amount of CPU resources, and most importantly, it drains the battery really fast. Fortunately, there is still a workaround that can enable hardware video encoding in real time, however avoiding the closed system APIs, and some applications take an advantage of this. At DENIVIP Media, we have also developed and pilot-tested this functionality.
Interesting Samples
Let us consider some interesting samples relating to the above iOS SDK capabilities.
RosyWriter Sample
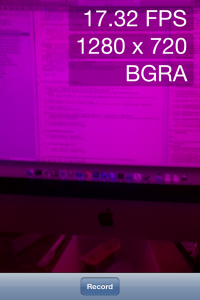
The RosyWriter project is available as part of the official Apple developer documentation. It demonstrates how it is possible to implement advanced video capturing and recording including per-frame processing of pictures obtained from the camera. In this case, processing consists of offsetting green color in the picture, but in your application you can obviously do anything you wish. In addition, the sample shows how you can make your own preview layer using OpenGL.
GLCameraRipple Sample
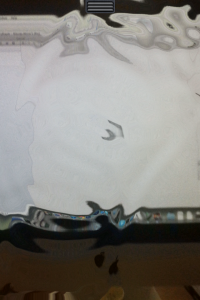
GLCameraRipple is another similar sample from the iOS SDK documentation. It demonstrates how to apply the wave effect to a video stream received from the camera, using OpenGL shaders.
For frame processing on GPU, the
1 | CVOpenGLESTextureCache |
structure is used. It has emerged with iOS 5 and can significantly speed up your xOpenGL processing, eliminating redundant picture data sending to the GPU and back.