This post is also available in: Russian

Wowza Media Server 3.1 is a popular media server to enable live streaming and VOD content delivery. Wowza Media Server’s major benefit is that it supports a variety of media formats. In this post, we will discuss how to enable live streaming using Wowza.
Unlike many other servers, Wowza Media Server is Java based. Compared to its main competitor, Adobe Flash Media Server, Wowza provides more features:
- Update: sometimes you can update the server by merely replacing .jar files in the "[install-dir]\lib" directory
- Enhance: based on the Wowza IDE development environment (preset Eclipse IDE), you can build and test modules to extend the functionality of the media server
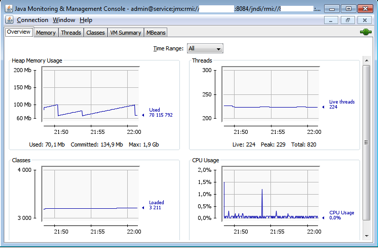
- Out-of-the-box monitoring: by using the JMX technology, you can monitor and manage your media server and java virtual machine (JVM) in real time;
Wowza is mainly criticized for its alleged lack of stability and performance. For example, here people have even developed a nginx plugin to support RTMP streaming without Wowza.
However, Wowza has nice capabilities to expand the basic functionality with plug-ins, including: transcoder, balancer, DRM, etc. In case of Adobe, such plugins are outside the scope of the media server product (my opinion is that they are quite right). But in small projects, enabling of the maximum ease of use of video platforms and focusing all the video logic in a single module could be very helpful.
Wowza Media Server is a cross-platform application, with builds made for different platforms (this is a consequence of the popularity and availability of Java on every platform):
- Windows (.exe)
- Mac (.dmg)
- Linux (.rpm, .deb, .bin)
To familiarize yourself, you can download a trial version of the server and its add-ons. To do this, you have to sign-on at the official Wowza Media Server Web site. The trial version is not limited in functionality, but the trial period is 30 days.
Wowza Server 3.1 Installation To install the server, you should first install Java 6 or newer. In our case, we have installed the jre-7u5-windows-i586 package. It includes all you need to run Wowza Media Server 3.1 and Wowza IDE 2. Wowza Media Server is installed in a standard way just in a few minutes.
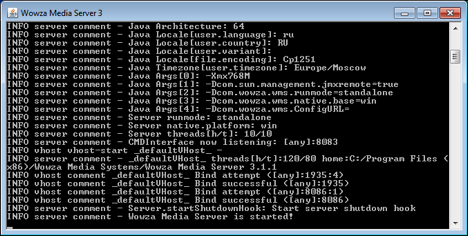 Wowza Media Server 3.1 run on Windows 7
By default, the streams are received via port 1935 (RTMP). To test the server, open its URL in the browser, for example: "http://127.0.0.1:1935"

Next, let’s discuss enabling of multi-bitrate streaming using HTTP Dynamic Streaming.
To do this, configure the dvr app: 1. Create the "[install-dir]\conf\dvr" directory. 2. Copy the "Application.xml" basic configuration file from "[install-dir]\conf" to "[install-dir]\conf\dvr". 3. Create the "dvr" directory in "[install-dir]\applications". 4. Make the following changes to the "[install-dir]\conf\dvr\Application.xml" configuration file, specifying the following parameters:
1 | <StreamType>live</StreamType> |
– stream type
1 | <StorageDir>${com.wowza.wms.context.VHostConfigHome}/dvr</StorageDir> |
– a directory storing smil files to receive multiple synced streams (multibitrate)
1 | <LiveStreamPacketizers>dvrstreamingpacketizer</LiveStreamPacketizers> |
1 | <Recorders>dvrrecorder</Recorders> |
1 | <Store>dvrfilestorage</Store> |
1 | <WindowDuration>0</WindowDuration> |
– record duration limitation. 0 – duration unlimited
1 | <StorageDir>${com.wowza.wms.context.VHostConfigHome}/dvr</StorageDir> |
– directory to save inbound streams
1 | <ArchiveStrategy>delete</ArchiveStrategy> |
– the parameter defining what to do with the previously recorded stream. If streaming stopped and has not been restarted within 5 minutes, the saved thread is deleted. Other possible values are specified in the Wowza Media Server documentation
1 | <HTTPStreamers>sanjosestreaming</HTTPStreamers> |
– HTTP Dynamic Streaming 5 is used as a streaming protocol. In the "[install-dir]\dvr" directory, create "live.smil" with the list of streams:
<smil> <head/> <body> <switch> <video src="live1" system-bitrate="348000"/> <video src="live2" system-bitrate="798000"/> <video src="live3" system-bitrate="1048000"/> </switch> </body> </smil> </code> Please note that, for the SMIL file you have to specify separately the total bitrate for each stream (video bitrate + audio bitrate). Below we will show you how to estimate the total bitrate.
Setting up streaming source using Flash Media Encoder Live 3.2 Adobe Flash Media Live Encoder (FME) - is Adobe Corp.'s free software designed to encode video streams or audio streams and send them to the media server.
For the purpose of this example, we will use a Web camera as a data source.
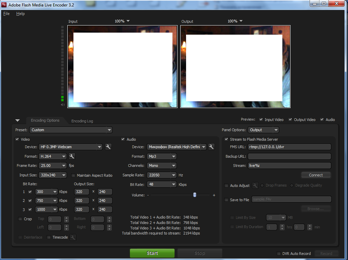
In the parameters of Flash Media Encoder (FME), please specify the bitrate of the stream transmitted to the Wowza media server. In our example, the server will receive three bitrates: 300, 750, 1000.
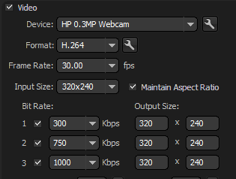
The bitrate data should be specified in the "live.smil" file of the "dvr" application.
Specify the URL of the Wowza Media Server and the name of the stream. As a transmission protocol, let's use RTMP. In this example, the stream named "live%i" indicates multiple streams called live1, live2, live3. If you are broadcasting a single stream, you may specify "live1", for example. "live1".

Viewing the stream To view the stream, let's use the video player located in the directory "[install-dir]\examples\LiveDvrStreaming\clientStrobe\DvrOSMFPlayer.html". This player exemplifies the use of OSMF open framework to modify the Strobe Media Playback player.
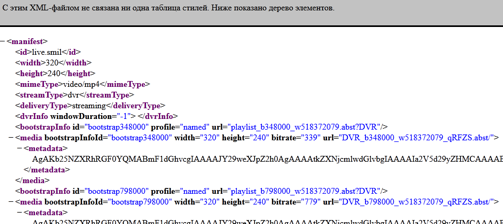
Now let's specify the manifest file URL: "http://127.0.0.1:1935/dvr/smil:live.smil/manifest.f4m?DVR" Having received the streams from FMLE, Wowza server takes some time to process them (about 1 minute). If the manifest has not been prepared, a manifest unavailable message is generated.
After creating, the manifest can be viewed by entering the following URL in the browser: "http://127.0.0.1:1935/dvr/smil:live.smil/manifest.f4m?DVR"
Having created the manifest, we can now view the stream:
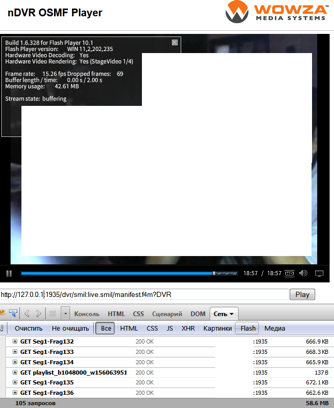
Note that the data is downloaded in segments (chunks) which signifies of HTTP Dynamic Streaming (HDS). Using the slider, you can view the previously saved data.
However it noteworthy that you can use other player implementations or your own OSMF based developments, but anyway you should take care of buffer utilization/underrun. A symptom of buffer underrun is freezing of picture and sound for a short time.
Monitoring the Wowza Media Server status To monitor and control the parameters of the Wowza media server and of Java Virtual Machine, you can use the application called JSonsole that is part of Java JDK.
To enable access to the JMX interface, do the following:
• Edit file "[install-dir]\conf\jmxremote.password" by specifying access parameters, e.g.: "admin admin"
• enable JMX support in "[install-dir]\Server.xml" configuration file
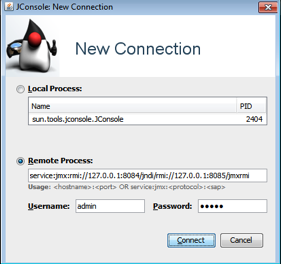
• specify parameters of connecting to JMX interface of the remote Wowza server, e.g.: "service:jmx:rmi://127.0.0.1:8084/jndi/rmi://127.0.0.1:8085/jmxrmi"
In the next article, we'll look at using the Transcoder AddOn and Wowza's performance characteristics at such an approach.
