This post is also available in: Russian

Video content is now ubiquitous on the Web, but sometimes user experience leaves much to be desired. We have already discussed here enabling high performance configurations to deliver video content based on Adobe Flash Media Server. Still, sometimes HTTP delivery is more efficient. In this article, we would like to give you an overview of how to build a high performance video delivery system based on NGINX and Apache Web servers.
Video delivery based on HTTP Dynamic Streaming offers a number of benefits to the end user:
- It provides higher performance of FLASH applications compared to RTMP due to lower RAM utilization (RTMP video stream is buffered to RAM, while HTTP stream is buffered to HDD).
- Narrow-band users can pause video and wait until it downloads completely to a PC. They can enjoy the highest quality at any connection rate. This is of primary importance to Russia, where by no means all providers have moved to modern links with high bandwidth.
- While navigating a video, the content buffer is not reset.
In this article, we will focus on building a high performance HTTP video content delivery system. The solution offered has several logical levels: network storage (disk array), backend servers (video fragment management), and a caching front-end. Using NGINX server as a front-end ensures efficient content caching and hence improves the overall system performance. Most optimum here is implementing intelligent query balancer based on front-end cache, but this deserves a separate article.

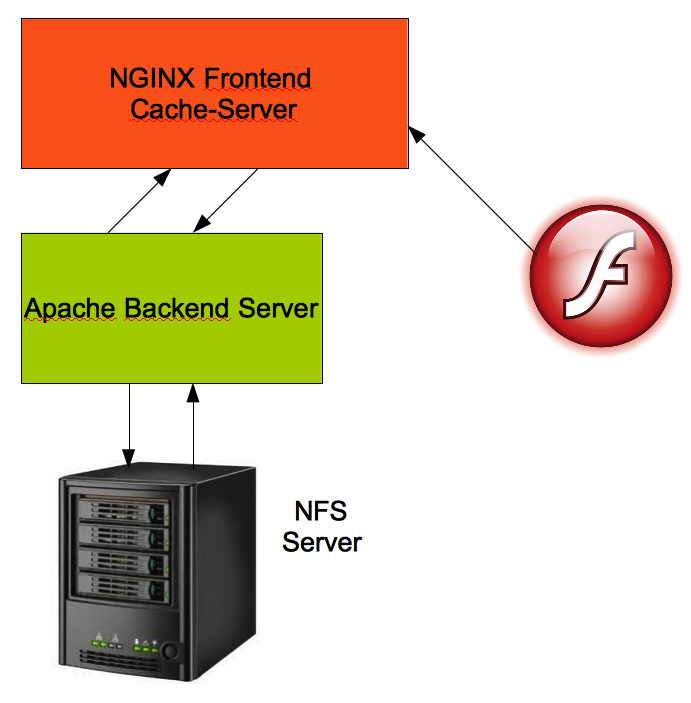
It should be noted that, although the offered architecture is tailored for content distribution using Adobe Flash Access 2.0, it is also efficient for flv and f4v container delivery.

Preliminaries
To build the cluster, a link between Apache ver. =>2.2.x (video fragment origin) and NGINX =>0.8.x. For this purpose, you will need the f4fhttp module, supplied with Adobe Flash Media Server.
Also, for video packaging, protection and fragmenting you will need the Adobe f4packager utility distributed as part of Adobe Flash Media Server.
You can download f4fhttp and f4packager from the Adobe Web site. There you can also find the description of video packaging procedure.
- The FLV format, also known as Flash Video. This is a popular format used for Web based video delivery. Currently it is used by such major video hosting sites as YouTube and Google Video.
- The F4V format was developed by Adobe and optimized for Adobe FMS to deliver HD content (for instance, DVR video recording on FMS is saved to this container).
- The F4F format (MP4 fragment) was also developed by Adobe to store encrypted video content. This format mandates Adobe Flash Access 2.0. F4F is closely related to f4v/flv as they use the same technology for file segmentation, enabling fragmented file output by the server. For instance, when the seek operation in Flash player is used, only the needed fragments are loaded from the Web server. For more details on format specification, please visit Adobe’s site.
High performance storage is integral to streamlining the solution operation. For instance, with ZFS and hardware Flash accelerators Sun Unified Storage 7000, an optimum content output rate can be reached. Similar performance could be achieved with other vendors also.
Configuring Apache Backend Server
In our configuration, Apache will function as an Origin server, using f4fhttp module to output segments of *.f4f video files to front-end servers. This solution is not limited to f4f video streaming. For FLV delivery, instead of Apache you can use NGINX built with ngx_http_flv_module (downloadable from module web page). In this case, the backend NGINX server will output FLV segments, and front-end NGINX will cache them. This also minimizes delays, as NGINX will no longer have to download the whole file to output segments to the Web server.
First of all, let’s enable f4fhttp module loading at Apache startup. To do this, add the following string to httpd.conf file:
1 | LoadModule f4fhttp_module modules/mod_f4fhttp.so |
Before doing this, make sure the files of the module are available in this directory.
Now let’s create a directory for video files delivered to customers, and change its owner:
1 2 | mkdir /var/www/video chown -c apache:apache /var/www/video |
Having created the directory, add the following code to the Web server configuration file:
1 2 3 4 5 6 7 8 9 10 11 12 13 14 15 16 | #Set the DocumentRoot directory DocumentRoot "/var/www/video" #Define Web server options for the directory <Directory /> Options FollowSymLinks AllowOverride None </Directory> #Set the parameters of operating with the directory <Location /vod> #Enable content streaming within the directory HttpStreamingEnabled true HttpStreamingEnabled true #Specify physical path to video containing folder #(used with symlink) HttpStreamingContentPath "/var/www/video/vod" </Location> |
Now the backend server is configured, you can restart it and proceed to the next stage.
Configuring NGINX front-end server
Having installed NGINX, change the configuration file as follows:
1 2 3 4 5 | http { …............ proxy_cache_path /data/cache levels=1:2 keys_zone=my-cache:8m max_size=80G; …............ } |
This defines the cache zone to store video fragment cache of 80GB.
1 2 3 4 5 6 7 8 9 10 11 12 13 14 15 16 | location / { …......... #Set the caching key. We are going to cache with parameters. #As our file names are always #unique, this guarantees that cache is also unique fastcgi_cache_key "$server_addr:$server_port$request_uri"; #Set the address of earlier configured Apache backend server proxy_pass http://10.0.0.1:80; #Set cache related parameters proxy_cache my-cache; proxy_cache_valid 200 302 60m; proxy_cache_valid 404 1m; …........ } |
Having modified the configuration file, launch the NGINX Web server and try to load video using Flash player configured to HTTP Dynamic Streaming. If servers are linked correctly, video content streaming will begin. Cache structure will be generated in the /data/cache directory.
1 | #gizmo> watch ls -lah /data/cache |
1 | Every 2.0s: ls -lah /data/cache/ |
1 | Fri Dec 10 18:46:29 2010 |
1 2 3 4 5 6 7 8 9 10 11 12 13 14 15 16 17 | total 68K drwxr-xr-x 17 nginx nginx 4.0K Dec 3 14:18 . drwxr-xr-x 10 root root 4.0K Dec 4 18:33 .. drwx------ 3 nginx nginx 4.0K Dec 3 14:16 0 drwx------ 4 nginx nginx 4.0K Dec 3 14:17 1 drwx------ 5 nginx nginx 4.0K Dec 3 14:19 2 drwx------ 7 nginx nginx 4.0K Dec 3 14:18 3 drwx------ 3 nginx nginx 4.0K Dec 3 14:17 4 drwx------ 4 nginx nginx 4.0K Dec 3 14:18 6 drwx------ 5 nginx nginx 4.0K Dec 3 14:16 7 drwx------ 3 nginx nginx 4.0K Dec 3 14:13 8 drwx------ 5 nginx nginx 4.0K Dec 3 14:15 9 drwx------ 3 nginx nginx 4.0K Dec 3 14:18 a drwx------ 5 nginx nginx 4.0K Dec 3 14:18 b drwx------ 3 nginx nginx 4.0K Dec 3 14:17 c drwx------ 5 nginx nginx 4.0K Dec 3 14:18 e drwx------ 4 nginx nginx 4.0K Dec 3 14:15 f |
For optimal performance of this configuration, you will also need to optimize OS kernel settings and NGINX caching preferences. Follow us for Linux OS kernel tuning and more.