This post is also available in: Russian

If you develop gaming or multimedia applications for iOS, then AirPlay is absolutely a must for you, almost a standard. Indeed, what could be better for a user than watching favorite videos or photos on a big screen of a plasma TV or playing advanced games using iPhone/iPad/iPod as a multi-touch joystick? AirPlay has been designed specifically for this purpose.
Well, are you still unfamiliar with AirPlay? No problem! In this post, we are going to brief you on this fascinating feature available since iOS 4.3, how to add it to your application, and provide you with a number of helpful tips.
Historical Overview

So, what is AirPlay? AirPlay is the capability to transfer video, photos and audio content to external devices via Wi-Fi, that is available since iOS 4.3. It means that, any device running iOS 4.3 or higher can become a transmitter of media content. As receivers, you can use specifically designed Apple TV or AirPort devices used to further transmit the content to video/audio devices. Alternatively, you can use end-user devices as receivers, provided they support this feature by default and are in the home Wi-Fi network. The technology is extremely easy-to-use. To listen to your favorite songs from iPod Touch on your home entertainment system, you have to enable AirPlay on your iPod, select a receiver from the list and, finally, press the Play button on the player. Now enjoy the music transmitted from the player to the audio system directly through the air interface. With video and photos, you can do absolutely the same.
It is worth mentioning that in addition to content playback from the device memory, AirPlay supports UIWebView and can transfer videos and music directly from the Internet.
However, Mirroring has one severe nuisance. Within the internal network, the Wi-Fi video stream is transmitted uncompressed, so to feel yourself at comfort you’ll need a pretty powerful home router.
AirPlay technology has not emerged out of nowhere. It was preceded by AirTunes released in 2004. Airtunes was limited to allowing the iTunes users to transmit tracks over Wi-Fi to external on-net audio devices. By 2010, the technology has been improved and first showcased on September 10, 2010. Now you can also transmit photos and videos over the network.
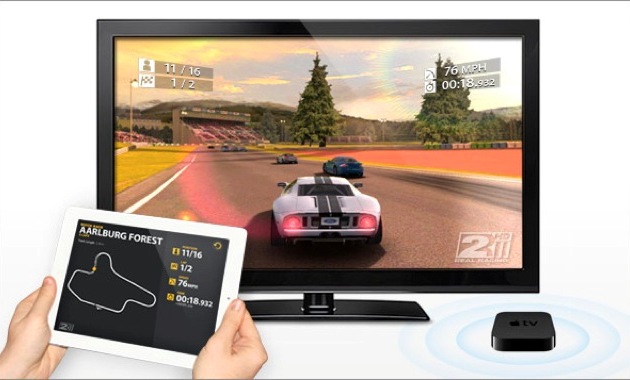
Of course, from the developers’ perspective, the original version of the technology has been somewhat limited. You could have only inserted the AirPlay button into the player, and then, in a drop-down menu, select a receiving device. However, in iOS 5 Apple provided developers with a new, truly helpful extension, the Mirroring feature. Using it, in addition to sending video from your player to an AirPlay-connected screen, you can transmit all your on-screen content. This feature substantially expands the scope of AirPlay, as now you can create a variety of dual-screen applications, seeing complete GUI of some advanced app on an external display and using the iOS device as a remote. This approach is widely used in gaming apps. For instance, you can run a race, where most of the action takes place on a big screen, and iPad may contain a steering wheel, a route map and the interface.
Adding AirPlay Button to Your Player Interface

So, have not you already become interested in quickly adding the AirPlay button to your app player? Nothing is simpler! For this purpose, the iOS API provides a separate view class called MPVolumeView. As its name suggests, the functionality of this class is somewhat related to adjusting the playback volume, and actually it is a standard volume slider. How does it relate to AirPlay? The fact is, there is no separate class attributed to the AirPlay button. It is built into the MPVolumeView class. If you set the showsRouteButton property to YES, here the button appears to the right of the slider. Then you just need to add MPVolumeView to the player interface and you will see the standard white AirPlay button. By clicking on it, a list of available data devices is shown. If you need just a button without a slider (for instance, you have your custom player with its own slider), you have to remove the slider from MPVolumeView by setting the showsVolumeSlider property to NO. Here is an example of adding a button to the player interface.
Sample code illustrating how to insert the button to the interface:
[gist id=4274801 bump=1]
Please note the AirPlay functionality is not encapsulated in the player class. This functionality runs across the whole system. As soon as you select a receiver, the system becomes immediately aware of that: when the player launches, it starts sending video to the device as needed.
Change the Button Appearance
![]()
You might wonder, what should be done in case you need to change the appearance of the button. Maybe you have your own player and are unwilling to make it look standardized. For this purpose, from the subviews array of MPVolumeView class you can get a reference to the AirPlay button. The AirPlay button is a normal UIButton class button, so if you have a reference, you can get access to all standard methods of changing its appearance. Getting a reference to the button is quite simple and is described here. The sample code of the reference is shown below:
[gist id=4274836]
However, if all you need is to change the image button, then starting with iOS 6 developers provide an easy-to-use method of the MPVolumeView class. It is called
-(void)setRouteButtonImage:(UIImage *)image forState:(UIControlState)stateUsing this method, you can easily change appearance of your button without having to run through all subviews of the array.
Tracking Availability of the AirPlay Button
Now you know how to add the Play button to your player interface and even how to configure its appearance. However, you may need to go a step further and want to receive notifications when there is no AirPlay compatible device on the network and the AirPlay button becomes disabled. Then it makes sense to remove the button altogether so as not to overload the interface by disabled elements. If you need to re-position other elements accordingly, you have to somehow estimate the time to call the setNeedsLayout method.
Unfortunately, neither the MPVolumeView class nor the player has any notifications related to the button. Therefore, there is no direct way to get a notification on availability or unavailability of devices. However, in this discussion the authors have proposed an elegant workaround. The essence of the method is, that when the AirPlay button is disabled, it is greyed out, and therefore the value of alpha changes for it. Hence, you can use the Key-Value Observing mechanism to change the alpha properties. So you can track the time when the button is enabled or disabled.
[gist id=4274864]
By the way, you can completely disable AirPlay support for the player. For this purpose, in AVPlayer you can set the allowsAirPlayVideo property to NO or set to NO the allowsAirPlay property in MPMoviePlayerController. Also, you can disable it in UIWebView, setting the mediaPlaybackAllowsAirplay property to NO. Also, MPMoviePlayerController can subscribe to the MPMoviePlayerIsAirPlayVideoActiveDidChangeNotification notifications. These notifications show that the status of video playback over AirPlay has changed. To check whether the AirPlay broadcast has started or stopped, you can check the airPlayVideoActive property.
Changes in iOS 6
In iOS 6 API documentation, AVPlayer class properties relating to AirPlay are labeled as deprecated, but the documentation is not stating which properties should be used as replacement. Looking closer at the AVPlayer.h header file, we noted new properties designed for iOS 6 only, whose names are exactly identical to the old names, but AirPlay is replaced by ExternalPlayback.
External Display AirPlay and HDMI
You are probably ready to come up with a question, why in an article called "AirPlay and HDMI" so much has been written of AirPlay, but nothing so far has been said about HDMI? Well, let’s fill this gap.
You can transfer image from the device to a screen not just via Wi-Fi, but also using an HDMI adapter. This connection is similar to Mirroring using AirPlay: the screen of the transmitting device is mirrored on an external display.
Displaying the content of the device on the screen is the default behavior. However it is possible that you wish to display another image on the external display or to leave it blank to a certain point. Q&A QA1738 and the documentation stipulate steps on defining external display and showing alternative information on it.
Essential here is to determine whether there are either external displays connected via AirPlay Mirroring or external HDMI displays, and receive notifications when a display is connected or disconnected.
In both cases, it is quite easy to achieve the desired effect. To determine whether the displays are connected, a static array of the UIScreen class called screens, is used. It keeps references to all screens connected to the device. The screen of the source device always has the zero index within the array. Please note that as external displays you can connect only devices that have emerged since iPhone 3GS. Additionally, you can detect whether the mirrored content is transmitted to the display. To do this, use the mirroredScreen property of the UIScreen class. According to the documentation, it contains a reference to the mainScreen of the transmitter, if Mirroring is available and enabled, otherwise it contains Nil.
The code illustrating detection of screens from the screens array and identifying Mirroring in them, is presented below.
[gist id=4274892]
To be notified of connection/removal of external screens, use notifications UIScreenDidConnectNotification and UIScreenDidDisconnectNotification, respectively. Below is an example of the code to handle notifications.
[gist id=4274903 bump=2]
Private API Features
All the methods described so far in this post are authorized, Apple does not prohibit their use. However, some of the actions apparently mandating Public API, are still banned. For example, you can not programmatically enable Mirroring or programmatically select a device from the list to connect via AirPlay. This post details how to call a menu to select a receiver device without using the AirPlay device (private class MPAudioVideoRoutingPopoverController), and how to fetch a list of devices available for connection and connect to any of them using AirPlay Mirroring (private class MPAudioDeviceController).
* * *
So, now you know AirPlay well enough to use it successfully in your applications. In this post, we have tried to bring together all the information on AirPlay that has been of interest to us while developing our own applications.
We hope that this article has been informative and helpful to you.